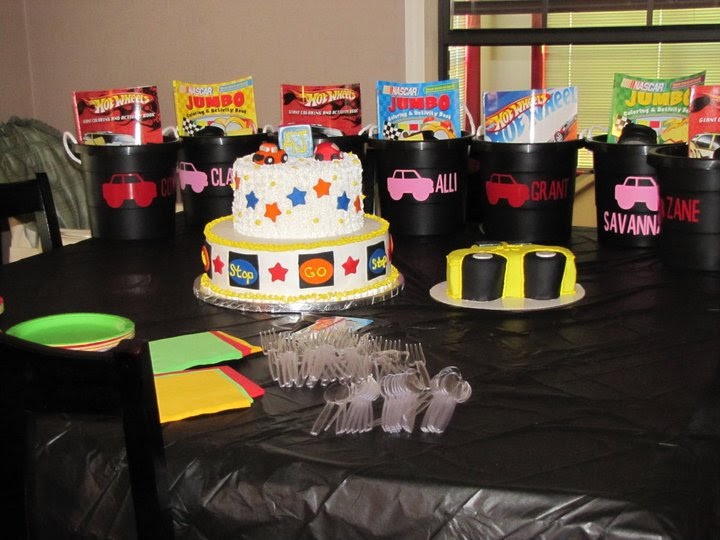
On the outside of each bucket I had a car and the childs name in vinyl from the Boys Will Be Boys cartridge. The boys were in red, the girls were in pink. Inside the buckets I had the filler, colors, a car coloring book, and a mug. The colors were car shaped - just used the Wilton Car candy molds. I melted crayons in the microwave and then filled up the molds, placed in freezer, and the viola! Car shaped Crayons! I put the crayons in a clear bag and had a topper on the bag with a coordinating car - except this car had a party hat from the Create a Critter cartridge (super cute, I thought). Lastly, each bucket had a cup for the kids. The boys had car paper inside their mugs with their names cut out and Xyron(ed) on from the Cuttin Up cartridge. The girls paper was gray wheels on it and their names were in pink letters. I think they turned out really well!
Wednesday, April 27, 2011
Aftermath...
OK, so the party is finally over with! LOL Loved decorating and all for it, but it made me a nervous wreck! So, I deviated a little from the invitations and created my own spin to it. I will post a video of the new ones that I actually used. I also made some super easy and cute favor buckets for the kids to take home. They were the black buckets from the dollar store - the ones I always think of people using when they wash their cars. I shredded up construction paper and put in the bottom as filler. I know that Walmart has the Easter grass and I could have used it, but I have a BIG hangup on people using holiday supplies for birthday - they aren't the same!!! (My husbands birthday is in December and he always has birthday gifts wrapped in red and green - hello!! My birthday is in August - would you give me a gift wrapped in Christmas paper?? Think not-so dont make his birthday a Christmas event!) OK, off soap box! So...
On the outside of each bucket I had a car and the childs name in vinyl from the Boys Will Be Boys cartridge. The boys were in red, the girls were in pink. Inside the buckets I had the filler, colors, a car coloring book, and a mug. The colors were car shaped - just used the Wilton Car candy molds. I melted crayons in the microwave and then filled up the molds, placed in freezer, and the viola! Car shaped Crayons! I put the crayons in a clear bag and had a topper on the bag with a coordinating car - except this car had a party hat from the Create a Critter cartridge (super cute, I thought). Lastly, each bucket had a cup for the kids. The boys had car paper inside their mugs with their names cut out and Xyron(ed) on from the Cuttin Up cartridge. The girls paper was gray wheels on it and their names were in pink letters. I think they turned out really well!
The party came together pretty quickly - just allow a little time to get all of it together, but overall, it was a pretty cheap endeavor, compared to ordering a bunch of stuff from Oriental Trading and half of it gets trashed!
On the outside of each bucket I had a car and the childs name in vinyl from the Boys Will Be Boys cartridge. The boys were in red, the girls were in pink. Inside the buckets I had the filler, colors, a car coloring book, and a mug. The colors were car shaped - just used the Wilton Car candy molds. I melted crayons in the microwave and then filled up the molds, placed in freezer, and the viola! Car shaped Crayons! I put the crayons in a clear bag and had a topper on the bag with a coordinating car - except this car had a party hat from the Create a Critter cartridge (super cute, I thought). Lastly, each bucket had a cup for the kids. The boys had car paper inside their mugs with their names cut out and Xyron(ed) on from the Cuttin Up cartridge. The girls paper was gray wheels on it and their names were in pink letters. I think they turned out really well!
Tuesday, March 22, 2011
1st Birthday
OK, so didn't get the pics up like wanted - hey, its Spring Break, so maybe I can get it up this week...notice...I did say Maybe!
However, I did get started on a project today, and I will put some pics up with this post. I have been dying to do an explosion box for my son, AJ, 1st birthday invite ever since I saw Momo do hers! Loved it! So...this is my take on it - this in the sample one, and I am starting to mass produce them but I have already changed just a couple of things - nothing big, just size and different shades of paper...SO! Here is what I have so far. The middle insert is still blank - it will have all of the actual party info-date, time, etc.
I would LOVE to do a quick vid of how and the actual measurements on them..but, we know how that goes, so I won't make any promises that I can't keep :)
The "Zoom" is behind the green truck, and the 1 and present are behind AJ's name. All items came from the Boys will be Boys cart except the birthday present, it came from the Create-A-Critter cart.
All black squares have the white faux stitching around them and black faux stitching around the letters.
For a first time adventure, I like how it turned out!
However, I did get started on a project today, and I will put some pics up with this post. I have been dying to do an explosion box for my son, AJ, 1st birthday invite ever since I saw Momo do hers! Loved it! So...this is my take on it - this in the sample one, and I am starting to mass produce them but I have already changed just a couple of things - nothing big, just size and different shades of paper...SO! Here is what I have so far. The middle insert is still blank - it will have all of the actual party info-date, time, etc.
I would LOVE to do a quick vid of how and the actual measurements on them..but, we know how that goes, so I won't make any promises that I can't keep :)
This is the box itself. We inked it all, which I love the ink effect, but because it is a car theme, it looked so much like grease to me! I just loved it!
This is what the inside looks like after you remove the lid.
This is the layer on bottom. The "Honk Honk" is behind the red car. The "Lil Racer" is behind the blue race car.
All black squares have the white faux stitching around them and black faux stitching around the letters.
For a first time adventure, I like how it turned out!
Sunday, February 13, 2011
Whew! It's been a while!
OK, so it has been a LONG while! I am wrapping up my Valentine's Goodies, but plan to post some of my past projects pretty soon. I have just been so busy with AJ walking around that I haven't had the time to post anything I have done :) I will try to get my Christmas Advent Calendar, December Daily, and Valentine's Goodies up in the next couple of days, if not sooner.
Subscribe to:
Posts (Atom)


